Why Microtopping in Bathroom Is an Ideal Choice for Waterproof, Seamless Surfaces
Microtopping in bathroom spaces represents a thin layer of specialized cement or polymer applied to floors, walls, and countertops that creates a smooth, decorative surface perfectly suited for modern homes and commercial spaces. Designers consistently choose this material because it works exceptionally well on multiple surfaces and installs much faster than traditional tile replacement projects.
What “microtopping in bathroom” means
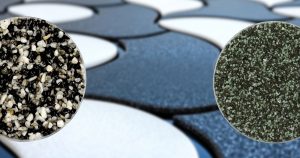
This advanced method utilizes microcement or micro-concrete applied in ultra-thin coats measuring just 2–3 mm thick, crafted from Portland cement, fine aggregates, and high-performance polymers that create an incredibly smooth, durable finish. These thin layers can be textured or polished to achieve various aesthetic effects, from industrial minimalism to warm, organic textures that complement any design vision.
Waterproof performance and moisture resistance compared with traditional materials
Many homeowners wonder if the microtopping is waterproof, and the answer is definitively yes when properly applied. Microtopping, enhanced with polymer additives and professional-grade sealants, delivers exceptional waterproof performance that surpasses many traditional finishes. In shower applications, a top coat of polyurethane or epoxy provides an impenetrable barrier against moisture penetration while requiring significantly less maintenance than conventional materials like ceramic tile or natural stone.
Seamless finish benefits: no grout lines, easy to clean, contemporary look
The continuous application process eliminates grout lines entirely, creating surfaces that are remarkably easy to clean and maintain while dramatically improving bathroom hygiene. This seamless approach delivers the clean, modern aesthetic that unifies floors and walls into one cohesive design element, making even small bathrooms appear larger and more sophisticated.
Durability and resistance to traffic, wear, and cracking when properly applied
Microcements reinforced with polymers and resins demonstrate exceptional strength and durability that far exceeds traditional cement-based materials. When applied correctly using proven techniques and quality products, these surfaces handle heavy daily use without showing wear patterns, though it’s worth noting that those considering microtopping advantages and disadvantages should understand that poor-quality materials or inadequate surface preparation can lead to hairline cracks, making skilled installation absolutely crucial for lasting results.
Understanding Microtopping Materials: Microcement, Acrylic Microtopping Cement, and Alternatives
Selecting the right material directly impacts both the visual appeal and long-term performance of your bathroom renovation project. Property owners make informed decisions based on aesthetic preferences, tactile qualities, maintenance requirements, and environmental considerations including composition, thickness capabilities, and sustainability factors.
Composition and technical properties
Today’s advanced formulations blend Portland cement with carefully graded fine aggregates and specialized polymers that create surfaces with remarkable strength and flexibility characteristics. Many premium products feature convenient on-site mixing capabilities that provide superior timing control and color consistency throughout the application process.
Resins integrated into the mixture significantly enhance surface longevity and adhesion performance across diverse substrate types, while liquid polymers reduce cracking tendencies and increase overall structural integrity. Fine aggregate selection controls surface texture, allowing installers to achieve everything from mirror-smooth finishes to subtly textured surfaces that provide slip resistance.
Acrylic microtopping cement utilizes acrylic binders that create exceptionally smooth finishes and cure faster than traditional cement-based mixtures, making it an excellent choice for projects with tight timelines.
Material Type | Thickness Range | Cure Time | Best Applications |
Standard Microcement | 2-3mm | 24-48 hours | Floors, walls, general surfaces |
Acrylic Microtopping | 1-2mm | 12-24 hours | Smooth finishes, quick projects |
Polymer-Enhanced | 2-4mm | 48-72 hours | High-traffic, wet areas |
Thickness and structural load
Microtopping’s ultra-thin profile, typically measuring 2–3 mm, adds virtually no structural weight to existing surfaces, making it perfect for renovation projects where floor height cannot be significantly altered. However, the system accommodates thicker applications when structural requirements or design preferences demand additional depth, proving particularly valuable for projects seeking to avoid costly structural modifications.
This versatility allows microtopping to perform excellently across numerous substrate types, making it an outstanding choice for updates that preserve existing architectural elements while delivering completely transformed aesthetics.
Differences with traditional finishes like Tadelakt
Traditional Tadelakt relies on lime plaster, olive soap, and hand-burnishing techniques to create soft, organic surfaces with considerable thickness that require specialized artisan skills and ongoing maintenance protocols. In contrast, microcement utilizes advanced cement, polymer, and resin formulations that deliver superior strength and substrate compatibility while providing the sleek, contemporary aesthetic that maintains waterproof integrity with minimal maintenance requirements.
Eco-friendly options and US product lines
Environmental consciousness has driven the development of eco-friendly microcement formulations featuring low VOC emissions and reduced carbon footprints, with manufacturers providing comprehensive certifications and technical data sheets for environmentally conscious projects.
SEMCO Surfaces and SEMCO X-Bond maintain strong reputations throughout the American market, offering complete system kits and technical support specifically designed for residential applications, while numerous other suppliers provide specialized products tailored for American construction standards and climate conditions.
Preparing Bathroom Surfaces for Microtopping Applications
Professional surface preparation forms the foundation of successful microtopping installations, requiring meticulous attention to cleanliness, stability, and moisture control. Installation teams conduct thorough substrate evaluations and remove all loose paint, oils, and existing sealers to ensure optimal adhesion performance that prevents future failures.
Substrate requirements
Establishing a solid, stable base proves absolutely critical for thin microtopping layers that rely on substrate integrity for long-term performance. Teams carefully evaluate concrete, cement board, or tile surfaces for structural soundness while addressing any deficiencies and conducting comprehensive moisture testing to prevent water-related complications that could compromise the installation.
Primers and leveling
Proper primer and leveling compound selection depends entirely on substrate characteristics and project requirements. Wall applications typically require specialized putty primers that address minor surface imperfections, while floor installations benefit from 2K leveling compounds that create perfectly even surfaces for optimal microtopping performance.
Non-absorbent surfaces require 2K Bonding Primers for proper adhesion, while porous substrates benefit from DEEP PRIMER applications that penetrate and stabilize the surface. Following manufacturer specifications precisely ensures reliable, long-lasting adhesion that prevents costly failures.
Tile and concrete prep without demolition
Microtopping revolutionizes tile renovation by eliminating demolition requirements entirely, allowing installers to sand existing tile faces and fill grout lines to create smooth, uniform surfaces ready for application. This approach saves tremendous time, money, and disruption while delivering superior results.
Mesh reinforcement in high-stress areas prevents cracking, while aged coatings receive light sanding to ensure fresh, receptive surfaces that promote optimal bonding between old and new materials.
Substrate Type | Preparation Method | Primer Required | Typical Issues |
Ceramic Tile | Sand faces, fill grout | 2K Bonding | Smooth surface adhesion |
Concrete | Clean, level, moisture test | Deep Primer | Porosity, cracks |
Existing Paint | Sand, remove loose areas | Bonding Primer | Adhesion, contamination |
Why surface preparation reduces risk of cracking and ensures adhesion
Thorough preparation eliminates weak layers and distributes stress evenly across surfaces, significantly reducing the likelihood of microcement cracking while promoting uniform curing. Professional primer and leveling compound application creates the strong, lasting foundation essential for premium microtopping performance that maintains its integrity for decades.
Step-by-Step Microtopping Application for Floors, Walls, and Shower Areas
This detailed application guide demonstrates proper microtopping installation across floors, walls, and wet areas including showers, covering A+B component mixing, WB pigment integration, and pot life management techniques that ensure consistent, professional results while avoiding common installation pitfalls.
Begin by mixing powder and liquid components according to manufacturer specifications, with most systems utilizing A+B components where A represents the powder base and B contains the liquid polymer activator. Add WB pigments gradually, starting with approximately 2% by weight for subtle color variations, increasing up to 10% for more dramatic, saturated colors that make bold design statements.
Work in manageable batches to control pot life effectively, as sealants and PU blends lose workability rapidly once mixed, making timing absolutely critical for smooth, even application across large surface areas.
Wall applications require Layer 1 using medium grain material at approximately 0.24 lb/sqft coverage, followed by a second medium grain layer at similar coverage rates for optimal thickness and durability. Floor installations begin with large grain layers applied at roughly 0.32 lb/sqft, followed by medium grain layers around 0.24 lb/sqft that provide smooth, even surfaces ready for final finishing.
Apply each layer thinly and evenly to control total thickness while minimizing cracking risks that can develop from excessive material buildup or uneven application techniques.
Light sanding between coats removes trowel marks and texture variations, with gentle abrasion sufficient for irregularities under 1/8 inch depth. More significant surface variations require aggressive sanding followed by thorough dust removal before applying subsequent layers, while gaps exceeding 24 hours between coats necessitate surface sanding to promote proper bonding and prevent delamination failures.
Monitor for visible relief patterns and trowel marks throughout the curing process, using soft metal or polymer troweling motions that minimize surface lines and imperfections. Persistent marks require light sanding and thin skim coat reapplication, while stubborn particles respond well to damp wiping using the mix’s liquid component, though over-wetting must be avoided to prevent profile alteration.
Wet environments and shower areas demand chemically cured top coats for reliable waterproof performance, with epoxy or PU resin systems recommended for direct water exposure applications. Wait minimum 48 hours after final microcement layers before applying PU resin systems, using common 10:1 weight ratios of resin A to hardener B components.
Apply thin coats not exceeding 150 micrometers thickness using foam rollers in criss-cross patterns, allowing proper cure times according to manufacturer recommendations for optimal waterproof barrier formation.
Application Step | Material/Process | Coverage Rate | Critical Success Factor |
Mixing | A+B components + WB pigments | 2-10% pigment ratio | Thorough mixing, batch control |
Wall Layer 1 | Medium grain microtopping | 0.24 lb/sqft | Thin, even spread |
Floor Layer 1 | Large grain microtopping | 0.32 lb/sqft | Thickness control |
Sanding | Light orbital/hand sanding | Remove >1/8″ variations | Complete dust removal |
Wet Area Sealing | PU resin top coat | 150 μm maximum | 48-hour cure time |
Finishing, Curing, and Achieving Desired Aesthetic Effects
After completing substrate preparation and base layer application, selecting appropriate finishes and top coats becomes crucial for both performance and aesthetics. Wet room applications benefit most from matte or satin top coats that provide excellent slip and stain resistance, while epoxy or gloss PU systems deliver stunning, high-impact visual appeal perfect for contemporary design schemes.
Professional polish techniques applied before sealing create beautifully smooth, lustrous surfaces, though maintaining slight texture improves safety and grip in shower areas and other high-moisture environments where slip resistance proves essential for user safety.
Color customization depends entirely on consistent pigmenting techniques and careful batch control throughout the application process. Experienced installers utilize WB pigments at approximately 2% concentrations for standard tints, increasing to 8–10% for deep, saturated colors that create dramatic visual impact, always checking results against high-resolution color references to ensure consistency.
When more than 24 hours elapse between coats, light sanding becomes essential for proper bonding and uniform color development across the entire surface area. Small, controlled mixing batches combined with clear labeling systems help prevent color mismatches in large installation areas that could compromise the final aesthetic result.
Curing times and walkability depend on material formulations and environmental conditions including temperature and humidity levels. Base microtopping layers typically set within 24–48 hours under normal conditions, while PU top coat applications become walkable after approximately 20–24 hours of cure time.
Complete chemical curing for full hardness and stain resistance requires approximately seven days under optimal conditions, making adherence to manufacturer schedules absolutely critical while maintaining temperatures above 60°F for predictable, reliable results. Proper curing ensures long-term resistance to wear patterns and staining that could compromise surface integrity over time.
Texture effects result from careful grain selection, specialized trowel techniques, and strategic sanding between application coats. Fine grains combined with progressive polishing create sleek, industrial aesthetics perfect for modern design schemes, while coarser aggregates and deliberate surface relief produce tactile, plaster-like effects that add warmth and character to bathroom spaces.
Professional installers consistently achieve high-end results by utilizing proven system components combined with controlled polishing and sealing procedures that balance modern aesthetic goals with exceptional durability and minimal maintenance requirements. Understanding microcement vs microtopping differences helps homeowners make informed decisions about which approach best suits their specific project requirements and design vision.
Those considering major updates should also explore bathroom remodel vs renovation options to determine whether microtopping applications align with their overall project scope and budget constraints.

Why Terrazzo GraniTech Is the Superior Microtopping Solution for Your Bathroom
While traditional microcement products have served the market adequately, Terrazzo GraniTech represents a revolutionary advancement that addresses every limitation of conventional cement-based systems. Unlike standard microtopping materials that rely on cement as their primary binder, Terrazzo GraniTech utilizes a patented granite and acrylic resin-based formulation that delivers unprecedented durability and crack resistance that simply cannot be achieved with traditional cement-based plasters.
The science behind Terrazzo GraniTech’s superior performance lies in its innovative composition that eliminates the inherent weaknesses of cement-based systems. Traditional microcement products are prone to hairline cracks due to cement’s natural shrinkage characteristics, but Terrazzo GraniTech’s acrylic resin matrix with anti-crack memory technology creates a flexible yet incredibly strong surface that moves with your building’s natural settling without developing unsightly fissures that compromise both aesthetics and waterproof integrity.
For bathroom applications specifically, this crack-resistant formulation proves invaluable because moisture infiltration through cracks represents the primary cause of microcement failures in wet environments. When homeowners research microcement bathroom pros and cons, they consistently discover that cracking remains the most significant concern with traditional systems, making Terrazzo GraniTech’s crack-free guarantee a game-changing advantage for long-term bathroom performance.
The application advantages of Terrazzo GraniTech extend far beyond superior crack resistance, offering homeowners the unprecedented ability to apply directly over existing tiles, natural stone, concrete, and virtually any stable surface without demolition requirements. This revolutionary no-demolition approach saves thousands of dollars in removal costs, eliminates permit requirements that delay projects for weeks or months, and prevents the dust, noise, and disruption that makes traditional bathroom renovations so challenging for families.
Professional contractors consistently report that Terrazzo GraniTech installations proceed 60% faster than traditional demolition and replacement projects, allowing bathroom transformations to be completed in days rather than weeks. The material’s superior workability and extended pot life provide installers with the time needed to achieve flawless results without the rushed application that often compromises traditional microcement installations.
The aesthetic possibilities with Terrazzo GraniTech surpass conventional microtopping options through its unique texture variations and rich color palette that creates surfaces ranging from smooth, polished elegance to subtly textured, natural stone appearances. The material’s granite aggregate content provides depth and richness that cement-based systems cannot replicate, while its acrylic resin binder maintains color stability that prevents the fading and discoloration common with traditional microcement applications over time.
Environmental sustainability represents another crucial advantage, as Terrazzo GraniTech’s formulation reduces carbon emissions compared to cement-heavy alternatives while providing superior longevity that eliminates the need for premature replacement cycles. The system’s exceptional durability means your bathroom surfaces will maintain their beauty and performance for decades, not just years, making it the most cost-effective choice when evaluated over the complete lifecycle of your renovation investment.
The proven track record speaks volumes, with thousands of successful installations across residential and commercial applications demonstrating Terrazzo GraniTech’s reliability in the most demanding environments. Professional installers report virtually zero callbacks for cracking or adhesion failures, a stark contrast to traditional microcement systems that often require touch-ups and repairs within the first few years of installation.
For homeowners seeking the ultimate combination of beauty, durability, and peace of mind, Terrazzo GraniTech represents the clear choice that eliminates the compromises inherent in traditional microtopping systems while delivering the seamless, waterproof surfaces that transform ordinary bathrooms into extraordinary spaces that stand the test of time.