Gravel Binder for Driveways: DIY vs. Professional Systems
![]()
What is a gravel binder and how it transforms driveways
A gravel binder is a liquid adhesive that mixes with loose stones to create a solid, stable driveway surface, and it’s used by both homeowners tackling weekend projects and contractors managing commercial installations. This liquid, commonly called a resin binder or polymer binder, works by coating each individual stone with a binding agent that sets and creates a matrix holding the stones together while leaving spaces for water to drain through.
The concept behind what is resin stone involves understanding how modern binding technology has changed traditional gravel surfaces. Different types of products are available on the market today. Some require mixing resin with stones before application, creating what professionals call a resin-bound system, while others apply a thin resin coat over the top of already-laid stones in a resin-bonded approach. Additional options include polymer emulsions that penetrate the gravel bed or mechanical stabilizer grids that physically lock stones in place.
The binding process works through adhesion at the molecular level. When you apply the liquid binder, it flows between and around each stone, coating the contact points. As the resin cures through chemical reaction or moisture activation, depending on the product type, it hardens and locks the stones into a unified surface. The result maintains some flexibility to prevent cracking while creating enough rigidity to resist displacement from traffic and weather.
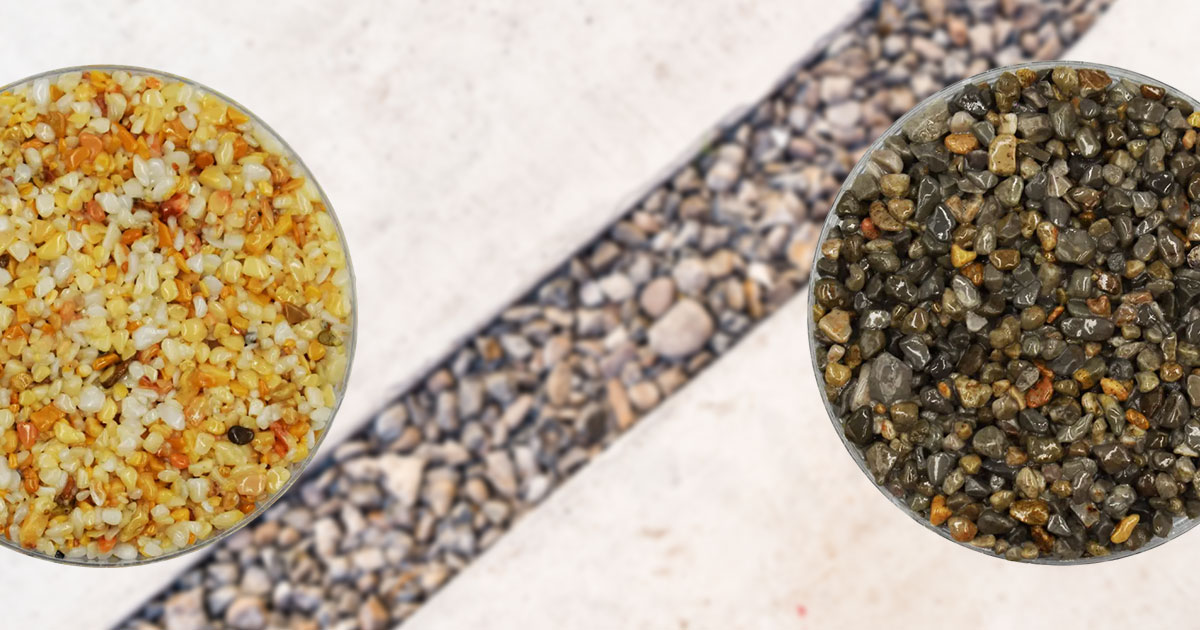
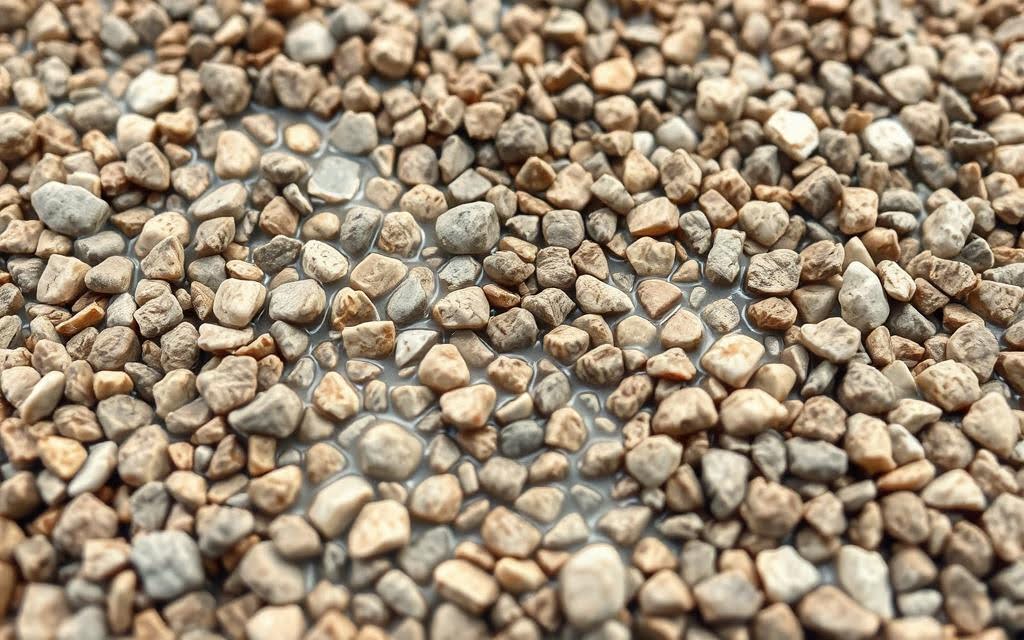
Common binders include two-part Polyurethan resins, which are popular for residential driveways because they cure reliably in various temperatures, and epoxy resins, which create an exceptionally hard surface but can yellow over time when exposed to UV light. Natural stones like marble chips, limestone, and granite work well as aggregate materials, and some homeowners even incorporate recycled materials like crushed glass for a unique appearance that reduces environmental impact.
The timeline for a usable surface varies based on weather conditions and product formulation. In good weather with temperatures above 50°F and low humidity, most surfaces become walkable in about four hours and ready for vehicle traffic within 24 hours. Cold or wet conditions slow the curing process significantly and can compromise the final strength, which is why timing your project around the forecast is critical for success.
Merkmal | Typical Options | Installer Notes |
Binder type | Two-part polyurethane, epoxy, polymer emulsion, stabilizer mesh | Polyurethane is common for resin driveway projects; epoxies cure harder but can yellow outdoors |
Aggregate | Natural stone (marble, limestone, granite), decomposed granite, recycled materials | Aggregate grade and shape affect texture, permeability and final color |
Application method | Mix and pour (resin-bound), apply resin and broadcast (bonded), lay grid then fill | Mixing speed and pour sequence control consistency and prevent premature set |
Cure and timing | Walk in ~4 hours, drive in ~24 hours; pot life 10-30 minutes depending on product | Dry weather and a stable base are essential for full strength and longevity |
Performance note | Permeable, load-bearing, attractive finish | Proper base prep, Entwässerung planning, and sometimes priming or mesh improve long-term results |
Benefits of using a gravel binder for driveways
A gravel binder transforms loose aggregate into a beautiful, long-lasting surface that outperforms both loose gravel and traditional hard paving in specific applications. The bound surface keeps your driveway looking neat and attractive over time while delivering functional benefits that matter for both aesthetics and property value.
Improved durability and load capacity
Resin bound gravel systems and professional stabilizers create surfaces strong enough to handle heavy foot traffic and vehicle loads without rutting or displacement. With proper Installation over a well-prepared base, these surfaces routinely last 15 to 30 years or more, far exceeding the lifespan of loose gravel that requires annual topping and regrading.
Reduced erosion and displacement
Binders lock stones in place, which dramatically reduces erosion from rain and eliminates the constant problem of gravel migrating onto lawns, into gutters, or down slopes. This translates to lower Wartung costs and safer walking surfaces without loose stones that create tripping hazards or damage lawn equipment.
Enhanced aesthetics and customization
The range of aggregate choices available today spans from classic white marble chips to recycled colored glass, which means you can match your driveway to your home’s architectural style and garden palette. Resin systems deliver a modern, seamless appearance that looks professionally finished rather than utilitarian, and you can create patterns, borders, or color transitions that aren’t possible with loose gravel.
Permeability and drainage advantages
Many gravel binder systems remain fully permeable after installation, allowing rainwater to filter through the surface into the ground below. This reduces standing water, eliminates puddles, and supports sustainable drainage systems (SuDS) that manage stormwater runoff and reduce flood risk in your neighborhood. Properties with permeable driveways often meet local environmental regulations more easily than those with impermeable concrete or asphalt surfaces.
Performance Area | Unbound Gravel | Gravel Binder (Resin/Stabilizer) |
Haltbarkeit under vehicles | Prone to rutting and displacement | Durable surface that resists rutting and wear |
Maintenance needs | Frequent topping and regrading required | Sweeping and occasional gentle jet wash |
Erosion and loose gravel | High risk of migration after rain | Reduced erosion, minimal loose gravel |
Aesthetic options | Limited, uneven finish | Wide choice of decorative pebble and color blends |
Permeability and drainage | Generally permeable but unstable | Permeability with controlled drainage, supports SuDS |
DIY gravel binder application: what homeowners need to know
Homeowners considering a DIY gravel binder project need to prepare thoroughly because small mistakes during application can lead to failures that cost more to repair than hiring professionals would have cost initially. This section covers the tools you’ll need, the workflow from start to finish, common mistakes that trap first-time installers, and realistic cost expectations for small to medium projects.
Tools and kits for a DIY job
Resin kits for driveways typically come with two-part resin and aggregate already sized for compatibility, but you’ll need additional equipment that rental shops carry. A forced action mixer with at least 100 kg capacity is essential because paddle mixers don’t create the thorough blending that resin requires, and you’ll also need steel trowels, clean buckets, a mixing paddle or drill attachment, and white spirit or manufacturer-recommended cleaner for your tools.
Prep: base inspection and edge work
Check your subbase carefully and repair any soft spots, drainage issues, or areas where the gravel depth is insufficient before you start mixing resin. Use proper edge restraints like metal or concrete edging to keep your bound surface from spreading at the perimeter, and lay geotextile fabric between the subbase and final gravel layer if your base tends to be muddy or if you’re working over clay soils. Calculate your material needs carefully and order 10-15% extra to avoid running out mid-project, because mixing a new batch later creates visible seams and strength variations.
Mix, pour, level and finish: step by step
Split your aggregate into manageable batches that you can pour within the resin’s pot life, which is typically 10 to 30 minutes depending on temperature. Measure the resin components precisely according to the manufacturer’s ratios because too much or too little hardener prevents proper curing, and mix thoroughly until every stone is evenly coated with a glossy film. Pour the resin-coated aggregate immediately onto your prepared base and spread it quickly to the specified depth using rakes and trowels. Work the material into corners and along edges, then finish the surface with a steel float to create an even texture. Most surfaces become walkable after four hours in good weather and reach full strength for vehicle traffic within 24 hours, assuming dry conditions throughout the curing period.
Common pitfalls DIYers should avoid
Working over inadequate bases causes the most frequent failures, and applying binder during rainy weather or when temperatures drop below 50°F almost guarantees problems with adhesion and cure strength. Poor mixing leaves dry spots where stones aren’t coated, and these areas break apart under traffic within months. Managing the resin’s pot life is critical because once it begins to set, you can’t spread it smoothly, and forcing partially cured material creates a rough, weak surface that looks unprofessional and performs poorly.
Cost and project timeline considerations
DIY saves on labor but might cost more than you expect for equipment rental like a quality mixer, which typically runs $50 to $100 per day. Material costs for resin and aggregate run approximately $3 to $8 per square foot depending on the product quality and aggregate choice, which means a typical two-car driveway costs $800 to $2,000 in materials alone. Small projects fit into a weekend if weather cooperates, but larger driveways or pathways can take multiple days when you factor in prep work, application time, and cure periods between layers.
Professional gravel stabilizer systems and installation process
Professional installation begins with a thorough site assessment where contractors measure the area, probe the soil to check drainage and compaction, and identify any weak spots that need attention before the surface goes down. This assessment determines whether you need extensive subbase work or if the existing base can support a resin overlay, which significantly impacts the final project cost.
Contractors prepare the subbase with more care than most DIYers can achieve. They excavate to proper depth, typically 6 to 12 inches depending on soil conditions and expected traffic loads, and they compact aggregate base layers in lifts using plate compactors or rollers to create a stable foundation. This prep work prevents the settling and movement that causes cracks and delamination in the finished surface.
Before laying down resin or polymer binder, professional teams often apply a primer to the existing surface, especially when working over old concrete or asphalt. They add mesh reinforcement where the site needs extra support, such as areas with unstable subgrades, steep slopes, or joins between different materials. This reinforcement prevents cracks from propagating through the resin layer and ensures the aggregate stays bound together even if the substrate shifts slightly.
Resin systems have short working times of 10 to 30 minutes after mixing, which means professional crews work quickly and coordinate their movements to spread and smooth material before it begins to set. Teams typically work in zones, with one person mixing, another pouring, and a third troweling to ensure consistent coverage and even color across the entire driveway. This choreographed process produces the uniform appearance that distinguishes professional work from DIY attempts.
Quality contractors offer warranties on their work and use UV-resistant resin formulations that prevent fading and maintain bond strength under years of sun exposure. They can provide documentation showing the installation meets local water runoff standards, which proves valuable during property sales or when dealing with municipal inspections. For large projects like commercial driveways or steep residential slopes, professional expertise becomes essential rather than optional because the consequences of failure are expensive and disruptive.
Step | What the professional does | Why it matters |
Site assessment | Measure area, probe soil, check drainage | Identifies weak spots and determines if subbase prep is needed |
Subbase prep | Excavate, compact, add aggregate layers | Creates stable foundation for long life and load bearing |
Priming | Apply primer to old concrete or asphalt | Improves adhesion and reduces delamination risk |
Mesh reinforcement | Lay geogrid or metal mesh where required | Prevents cracking and supports movement on slopes |
Mixing and placement | Use forced mixers, manage pot life, coordinate team troweling | Ensures even coverage and consistent finish on large jobs |
Quality checks and documentation | Permeability testing, UV protection specs, warranty issue | Provides proof of SuDS compliant install and workmanship guarantee |
Longevity, maintenance and life-cycle costs of DIY vs professional installs
Choosing between DIY and professional installation affects both the immediate budget and the total ownership cost over decades. A properly installed resin surface routinely lasts 15 to 30 years when the base preparation meets professional standards, but homeowners who skip base work often see failures within three to five years that require complete replacement rather than simple repairs.
Professional contractors bring experience that helps them avoid the common mistakes that shorten surface life. They understand how weather, soil type, and traffic patterns affect long-term performance, and they adjust their installation methods to match your specific site conditions. The warranties that professionals offer typically cover workmanship for one to five years and sometimes include material performance guarantees that DIY installers can’t match.
Routine maintenance for a resin driveway is straightforward and takes less time than maintaining loose gravel or asphalt surfaces. Sweep away loose debris and leaves regularly to prevent organic material from staining the surface or clogging the permeable structure. Use a gentle jet wash once or twice yearly to remove embedded dirt, but stay away from high-pressure settings that can damage the resin bond or dislodge aggregate. Avoid harsh chemical deicers during winter because some formulations attack resin bonds and weaken the surface over time.
Small damages from heavy impacts or localized failures respond well to spot repairs where technicians clean out the damaged area, re-treat the base if needed, and apply fresh resin and aggregate that blends with the surrounding surface. Larger issues like widespread delamination or base settlement require more extensive repairs that might involve removing the failed section and rebuilding from the subbase up. Choosing quality materials and proper installation methods during the initial work helps you avoid these major repairs.
The total cost of ownership calculation needs to include the initial installation price, routine maintenance expenses, repair frequency and cost, and the expected lifespan before replacement becomes necessary. Professional work costs significantly more upfront than DIY, often two to three times as much, but the reduced maintenance needs and longer service life make it less expensive over the 20 to 30 year ownership period that most homeowners plan for. Compared to asphalt that needs seal coating every few years or concrete that cracks and stains, resin driveways offer better value through lower lifetime costs and superior appearance retention.
Performance in varying weather and drainage conditions
The long-term Haltbarkeit of your gravel binder depends heavily on weather patterns and drainage management at your site. Successful installations work over a strong subbase with proper edge support and incorporate features that address your local climate challenges, whether that means freeze-thaw cycles, intense summer heat, or heavy rainfall.
Flexible resin and polymer binders handle freeze-thaw cycles better than rigid materials because they expand and contract slightly with temperature changes without cracking. A well-compacted subbase or air-entrained concrete under the resin surface prevents frost heave that lifts and cracks rigid pavements during winter. For sites that experience intense sun exposure, choose UV-resistant resin formulations that maintain their color and bond strength for years rather than breaking down and yellowing after a few seasons.
Permeable gravel binders support sustainable drainage by letting water filter through the surface into the ground below, which reduces runoff volume and eliminates the puddles that make driveways difficult to use during rainstorms. This permeability helps properties meet SuDS compliance requirements and reduces pressure on municipal storm drain systems. Sites with heavy runoff from surrounding areas need additional drainage features like infiltration layers, French drains, or surface channels to handle the volume without overwhelming the permeable driveway.
Site-specific factors like soil type, slope angle, and rainfall intensity determine which design features your installation needs for long-term success. Clay soils hold water and increase frost susceptibility, which means you need deeper subbase preparation and potentially under-drains to keep water moving away from the surface. Sandy soils drain quickly but provide less support, requiring careful compaction and possibly geotextile stabilization. Steep slopes over 7% need mechanical stabilizers or reinforced binder systems to prevent washout during heavy rains, and high rainfall intensity areas require deep subbase layers with clear drainage paths to manage the water flow.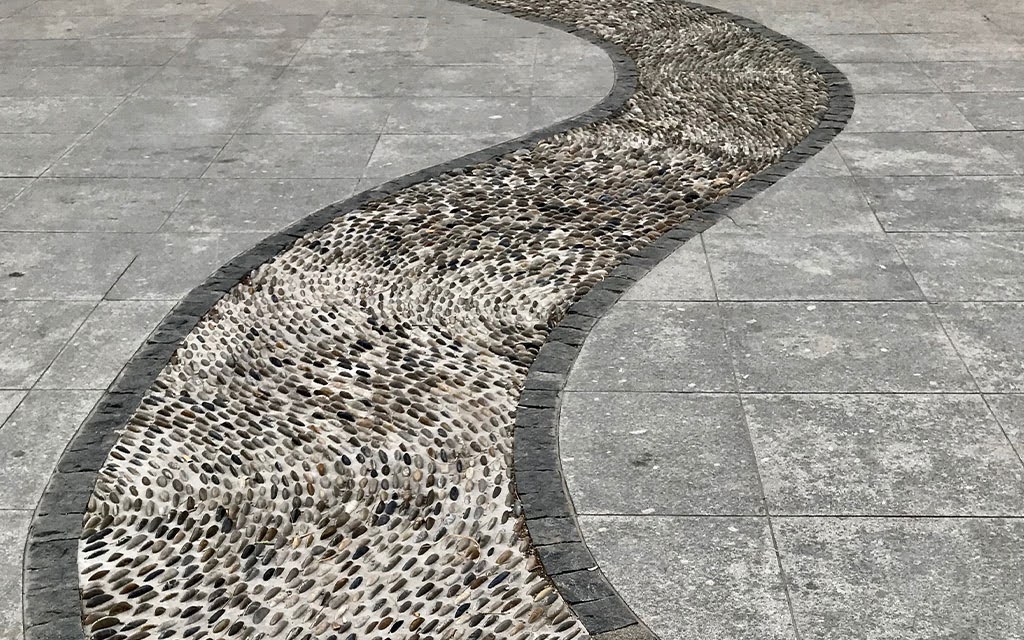
Aesthetic and landscape integration with hardscapes and pathways
The right gravel binder installation complements your home’s architectural style and integrates seamlessly with existing hardscapes, creating a cohesive outdoor environment that looks intentional rather than patchwork. Color selection, edge treatment, and transition details determine whether your new driveway enhances your property’s curb appeal or looks like an afterthought.
Natural stone aggregates like marble chips offer bright, clean appearances that work well with contemporary homes, while limestone provides warm, earthy tones that complement traditional architecture. Pea gravel and decomposed granite deliver rustic textures that suit cottage or craftsman styles, and resin systems let you blend multiple colors and stone types to create custom palettes that match your home’s exterior colors while maintaining the structural benefits of bound surfaces.
Edge strategies keep your gravel surface contained and create tidy borders that separate the driveway from planted areas or lawn. Metal edging provides clean, modern lines that work for contemporary designs, while natural stone creates a more organic transition that suits traditional landscapes. Concrete edges offer the most structural support for areas that carry heavy loads near the perimeter, and all edge types should be installed before you pour resin to ensure the bound surface has something solid to terminate against.
Smooth transitions between your resin driveway and other hardscape elements like pavers or concrete walkways prevent tripping hazards and create visual continuity. Use a thin band of matching pavers or a border of contrasting aggregate to bridge between different surface types, and ensure that height differences stay within safe limits to avoid liability issues. Proper detailing at these joins also prevents water from undermining either surface by creating channels or pooling areas.
Why Terrazzo GraniTech Monolith is the superior resin stone solution
Terrazzo GraniTech Monolith represents the next generation of gravel binder technology, specifically engineered to outperform traditional epoxy and polyurethane systems through advanced UV-resistant resin chemistry and superior flexibility. Unlike conventional products that yellow, crack, or delaminate after a few years of exposure, Monolith’s 100% water-permeable formulation maintains its appearance and structural integrity across all climates while supporting sustainable drainage requirements that matter for both environmental compliance and property value.
The system installs directly over stable existing bases like concrete or asphalt, which eliminates demolition costs and project delays while delivering a seamless finish that handles high-traffic residential and commercial applications. Monolith’s flexibility prevents the brittleness and cracking that plague rigid resin systems, and its UV-resistant technology protects against the fading and discoloration that ruins the appearance of inferior products within just a few seasons. The full permeability allows water to flow through naturally, reducing runoff and promoting sustainable drainage without sacrificing load-bearing capacity or surface durability.
For homeowners and contractors looking for a future-proof driveway, patio, or walkway solution that combines aesthetic versatility with proven long-term performance, Monolith delivers the superior results that justify its position as the premium choice in resin stone surfacing. The product’s engineered durability means you invest once and enjoy decades of low-maintenance beauty rather than facing repairs, recoating, or premature replacement that plague lesser systems.
